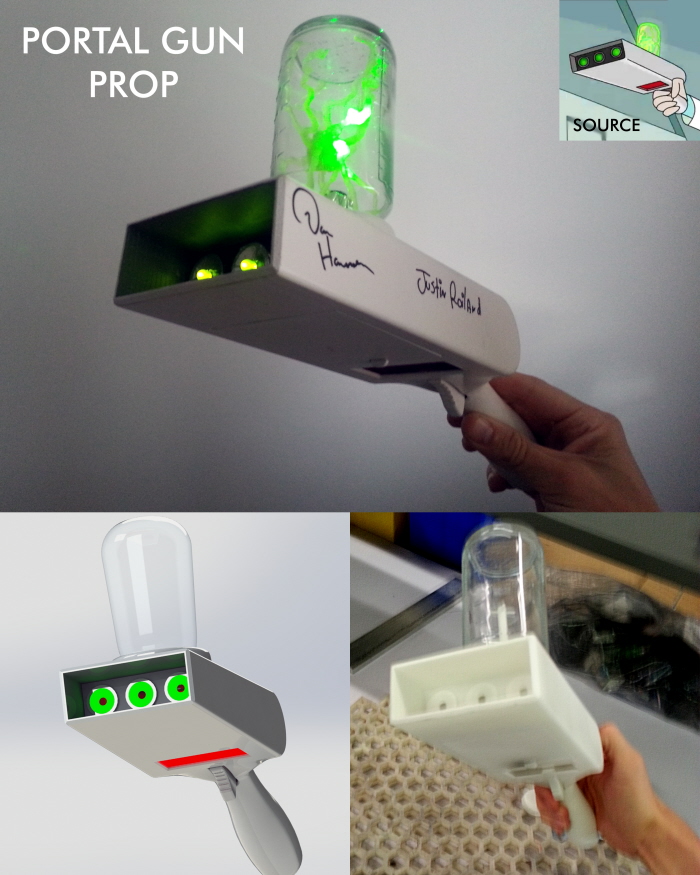
This project was made for a costume based on a cartoon character, and was completed under considerable time constraints. The CAD work was completed in under 5 hours, and was printed overnight in Nylon 12 on an EOS P730. The parts were then processed with heavy and fine sanding, priming, and painting over the course of the following day. Finally, the electronics were wired up and tested on the third day, after the paint had finished setting. A green laser diode was used to fluoresce the "energy chamber" on top of the device. This prop was eventually presented to the cartoon's creators, who were pleased to sign the prop.
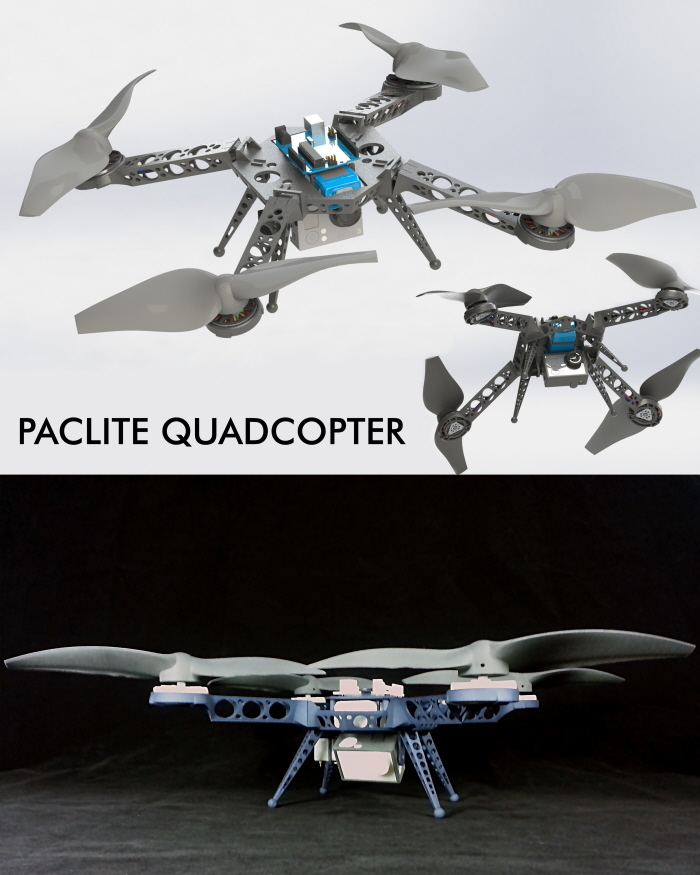
In an effort to push the limits of functional 3D printed objects, I designed a quadcopter robotic drone, the frame of which could be printed in one whole piece. The main feature of the Paclite, is the ability to fold the four arms down, reducing the stowed form factor of the robot to something the size of an american football. Designed around actual components used in regular quadcopter construction, the frame includes a mounting slot that can be easily reconfigured for any control board the user would want. The design also features a camera gimble on a tilt axis. The final design was printed of both carbon fiber filled nylon 12 and standard nylon 12 on an EOS P390 and P760 respectively. Some of the standard white nylon parts were then dyed a blue-grey for aesthetics. Stand-ins for actual components, such as the battery, motors, and control board were also printed.
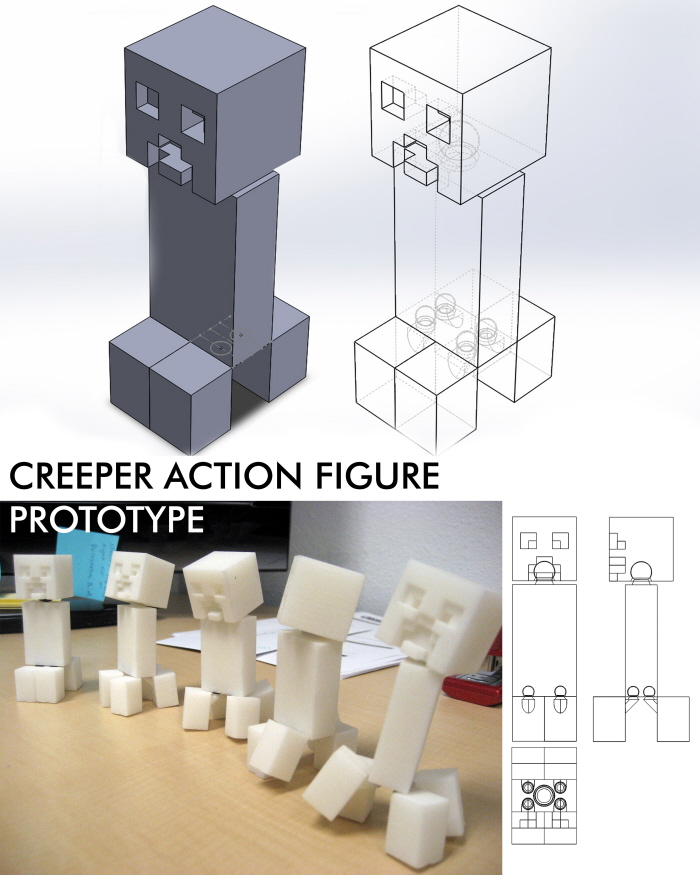
Intrigued by the lack of merchandise for the popular video game, Minecraft, I took it upon myself to design my own take on the characters and creatures in the game; the most iconic of which is the Creeper. I wished to emulate the range of motion the appendages of the Creeper showed in the game, while trying to keep consistent with the Minecraft's blocky aesthetic. Ball and socket joints were employed strategically to achieve this. A limited run of prototypes were made of nylon 12 on an EOS P730, and assembled by hand.
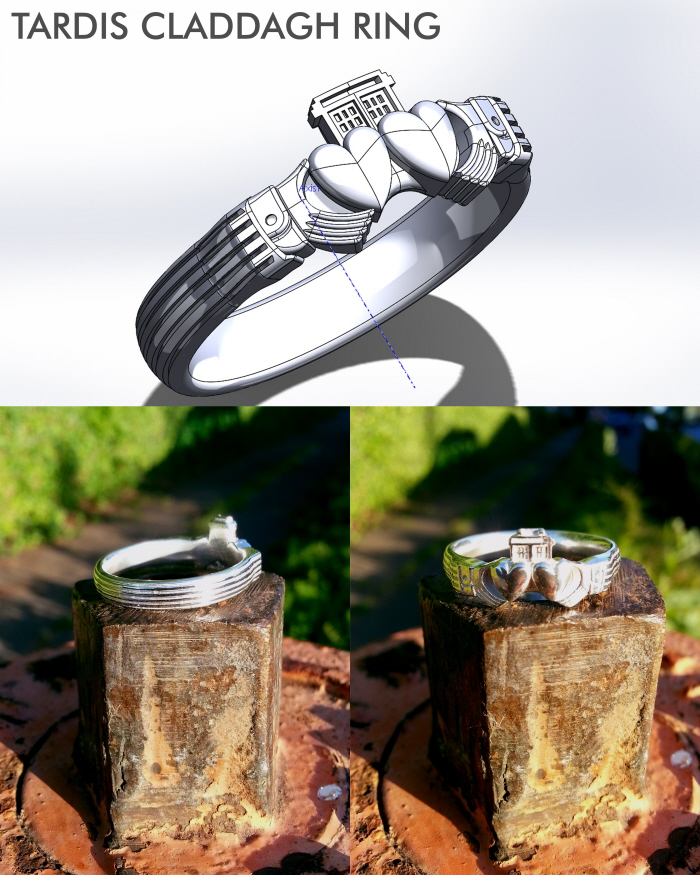
To celebrate their anniversary, a friend of mine wished to present his significant other with a customized ring that combined the cultural and traditional aspects of an Irish Claddagh ring, and his and her favorite scifi TV show, Doctor Who. I took the traditional Claddagh ring's motif of hands holding a heart, and combined it with the fact that the main character from Doctor Who has two hearts. Some Claddagh rings also feature a crown above the heart, which I replaced with the main character's primary mode of transportation: a 1960's British police telephone booth. When the design was approved by my friend, the design was sent to Shapeways.com for 3D printing in sterling silver. The ring was sent back to me for final polish and cleanup, and then was shipped to my friend. The gift was received with great enthusiasm.
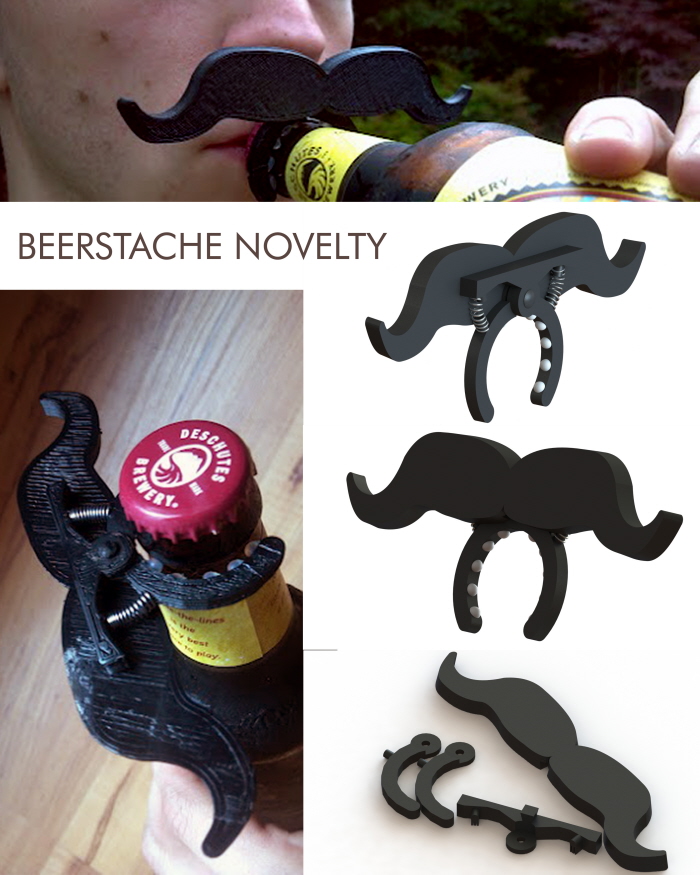
Originally created in Google SketchUp, the Beerstache is my first foray into designing a multiple-part product and prototyping it on my personal Makerbot 3D printer. The idea for the Beerstache was abstracted from drinking straw clip-on mustaches, and personal drink identification clips. My first design iteration was a single part with rigid prongs designed around one specific bottle. Upon trying it out on multiple bottles, the prongs were either too small or big. My redesign addresses the issue with a set of spring-loaded prongs on a rivet. The mustache can be removed from the clip and interchanged with different designs to personalize one's clip. The ABS plastic it was printed with became slippery when it met condensation on the bottle, and would fail to hold the mustache in place, so dabs of silicone were added for friction. Eventually, the CAD file was recreated in Solidworks, allowing for parametric customization.
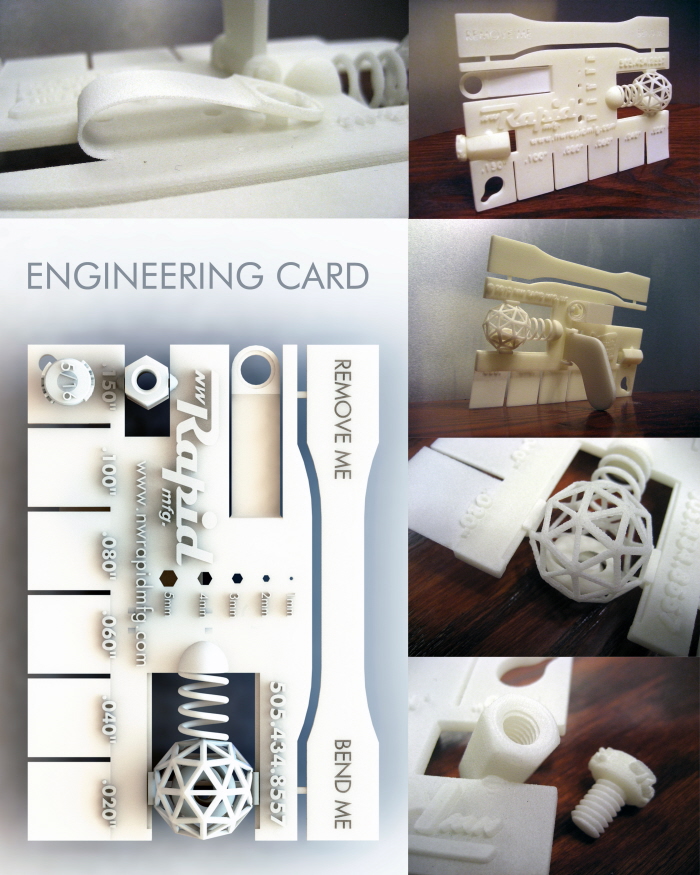
The easiest way to explain capabilities 3D printing to a prospective designer, is to present a printed part and point out attributes prudent to their design. Capitalizing on this idea, I designed a postcard-sized part that explores capabilities of the printers and materials used at NW Rapid Mfg. Along the bottom of the card are six slats in decreasing thickness (.002"/slat) to show flexibility and strength of the material. Across the top, an ASTM type IV tensile strength coupon that the user is encouraged to snap off and truly test the bending limits of the material. On the right is a geodesic sphere on a spring and rails with a captured object inside the sphere to showcase moving parts, complex geometry, and fully printed mechanisms. On the left of the card is a nut and bolt assembly showing resolution and tolerances. Just above it is a living hinge that snaps onto a clasp on the rear. Finally, there is a kickstand on the back which locks into place so that the card may be displayed.
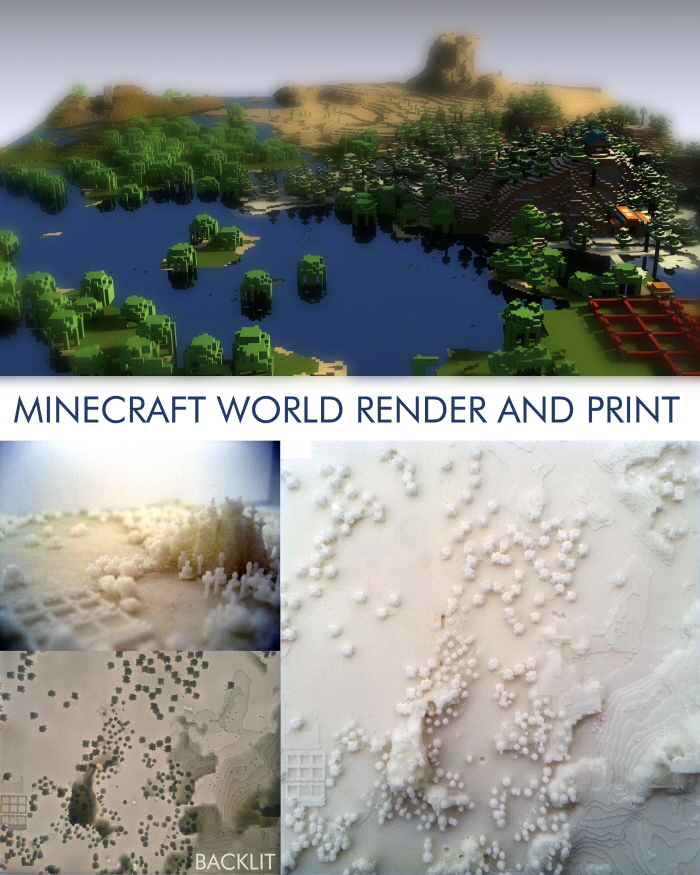
In working with action figures from the game Minecraft, I became interested in what assets I could export from the game for 3D printing. After doing some research, I discovered it was possible to export my procedurally generated and unique world from the game. I used the resulting .obj 3D file to create a render of the area surrounding my character's house. I then converted the .obj into a .stl file and printed it on an EOS P730 out of Nylon 12. The model measures about 8 inches squared, and displays an incredible level of detail, right down to the windows on the house and vines on the trees. When set against a light source, the contours of the terrain and foliage create an aesthetically interesting lithopane.
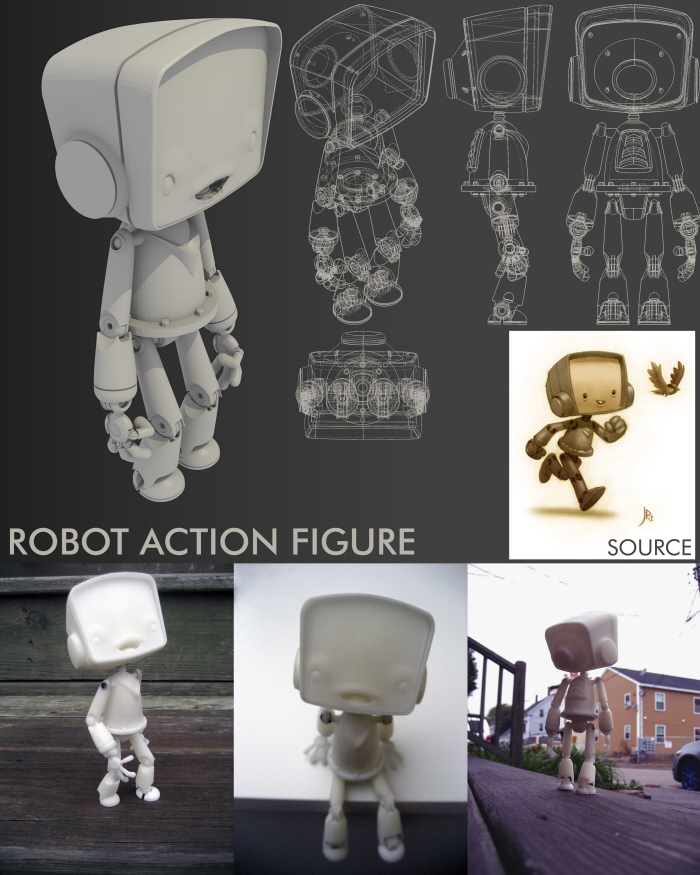
In 2007, I was introduced to a comic by artist Jake Parker titled "The Robot and the Sparrow." The comic was full of heart and utilized a design style I really liked. After learning the basics of Solidworks, I decided to design an action figure of the main character; the robot. To model the face, I exported the basic shape from Solidworks, and then digitally sculpted on it in Zbrush to better achieve organic curves and features. Being a fan of action figures, I was able to utilize joint techniques I had studied, and incorporate some of my favorite aspects used in figures. To that end, the robot has 22 points of articulation, including 5 ball and socket joints, allowing for a diverse range of movement. The hands are removable and replaceable with other hands in different poses. Finally, the face is also removable, revealing a compartment in the head in which to store the extra hands, and to swap out different facial poses.
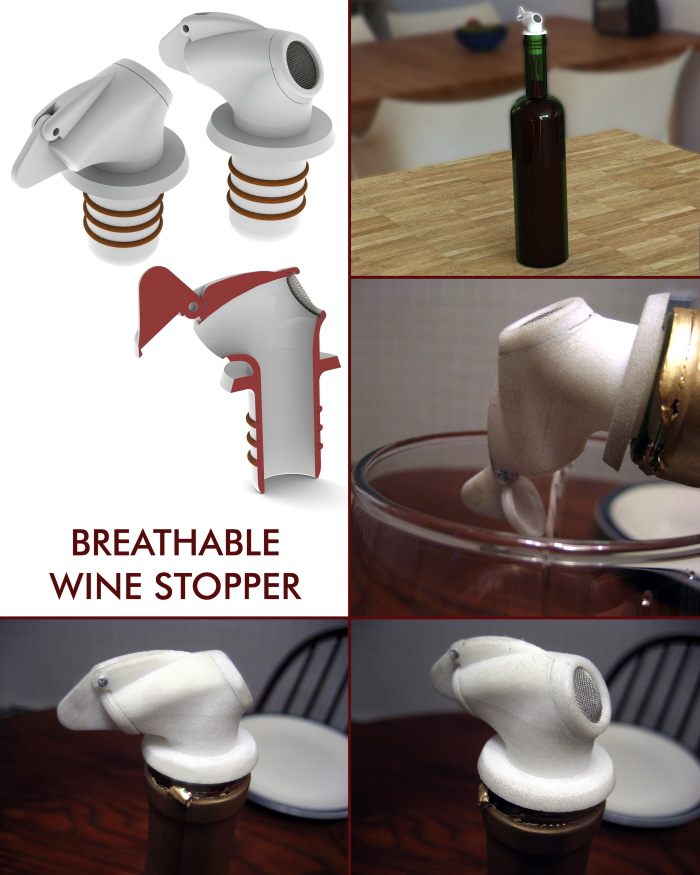
The aim of this collaborative project with vineyard owner, Andy Wilder, is to create a wine stopper that solves many of the issues presented in wine pouring. First, wine needs to breathe for about 30 minutes after it is uncorked and before it is served. Leaving a bottle open is an invitation for insects to fly in, and pollute the wine. This stopper uses a mesh screen to allow aeration, whilst preventing insect ingress. When it comes time to serve the wine, this stopper does not need to be removed, as a weighted flap on the pouring spout automatically opens when the bottle is tilted for pouring, and will reseal when the wine is set back down. This also prevents insects from fouling the wine. The stopper snugly fits into most bottles by way of 3 silicone o-rings around the base. This is the first working prototype, and we have learned of many issues with the design, but the basic concept has been proved successful. The issues will be addressed in the second revision.
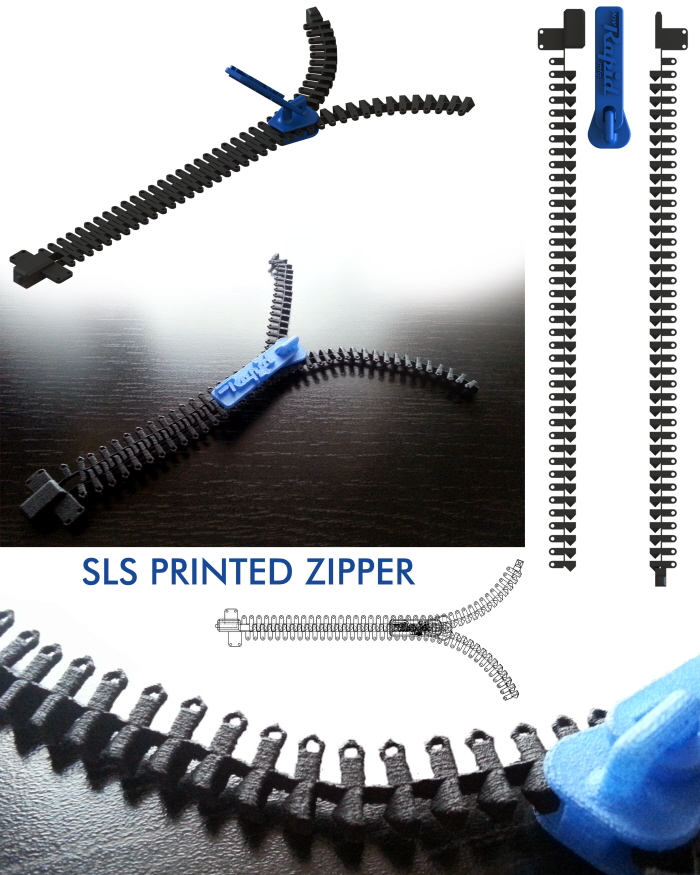
When I was introduced to Nylon 12 as a material for 3D printing, I found its material properties astounding and wanted to push its limits. The two main properties I wanted to focus on were the flexibility and strength exhibited in small features. To that end, I decided on recreating a zipper with nothing but printed parts. Researching the mechanisms of standard zippers allowed me to recreate the structures in Solidworks relatively easily. However, upon printing the first prototype, it was discovered that the spacing between the teeth was too loose, and the zipper came apart. Through trial and error, the final revision of the zipper functioned with the ease of a store-bought one. Tabs with holes were added on the outer edge so that the zipper may be sewn into clothing. Finally, the parts were dyed in an acid dye bath to colorize the nylon, and add to its aesthetic. I applied NW Rapid MFG's logo and phone number to the pull tab, and the zippers were handed out at trade shows.
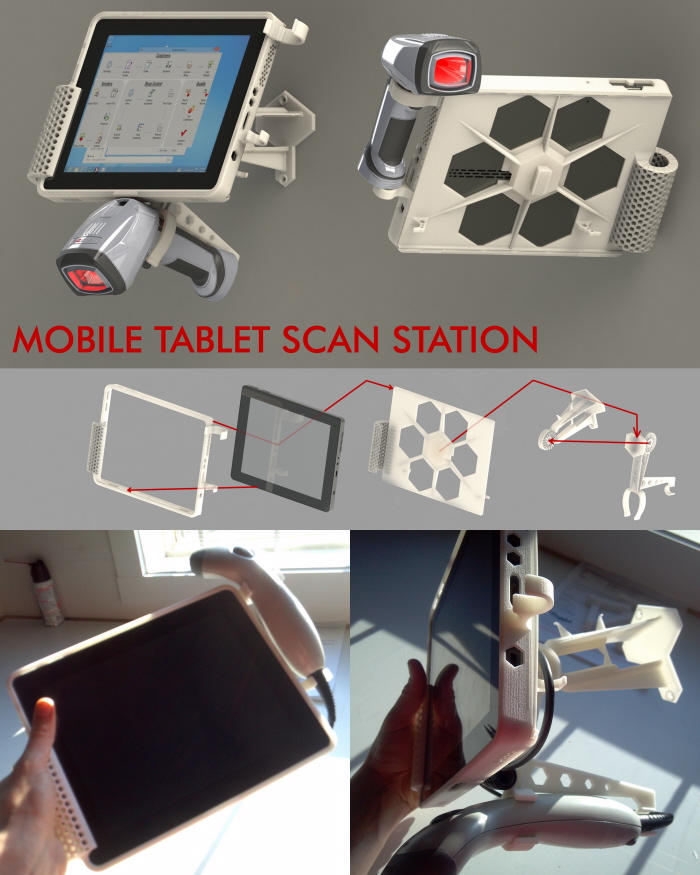
When NW Rapid Mfg. adopted a new logistics software package, a clock in/out system was implemented. To simplify the process, tablet computers with barcode scanners were purchased. The tablets were to be mounted on walls in key locations and were also to be mobile for scanning inventory items around the facility. To meet those requirements, I designed this mount/case system. When scanning documents at the wall-mounted station, the barcode scanner can be clipped in under the tablet in an easy to scan location. When the user needs to scan elsewhere, the scanner get placed in the holder to the right of the screen, and the case for the tablet slides out of the wall mount. In this configuration, the user can still use their right hand for the touchscreen, while holding the unit in their left. The 4 parts that compose this system are easily assembled with 3 screws, and are printed of durable Nylon 12.
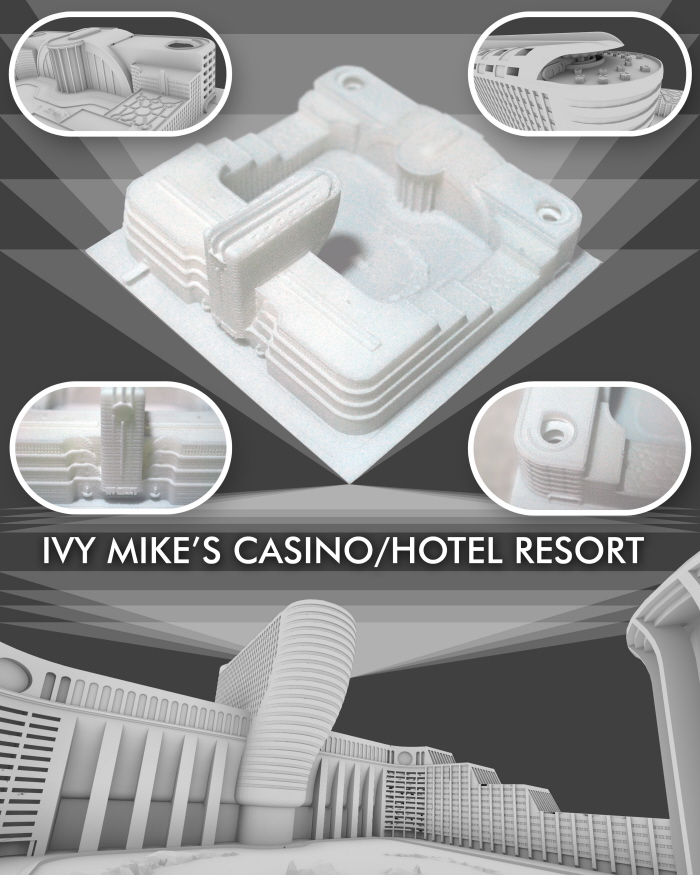
The concept for Ivy Mike's stemmed from a conversation about weapon tests in WWII with my friend. The first hydrogen bomb test was named Ivy Mike, and happened near the Bikini Atoll in the Pacific Ocean. The conversation then turned to discussing how Ivy Mike sounded like a name for an interesting casino. By the end of the talk, we had fleshed-out the concept and I went to work on its design. Ivy Mike's is a 1940's themed hotel and casino situated on the block where the Tropicana currently resides on the Las Vegas Strip. The hotel features convention halls on the upper floors, a large pool courtyard with atoll-shaped artificial islands, and the rear of the courtyard has a WWII technology museum. There are two large parking garages flanking the museum, walking gardens on the roofs, and an open-air restaurant and bar on the top of the main tower. Art Deco motifs were heavily used alongside elements from atomic-era cruise ships and locomotives. A scale model was printed on an EOS P730.
gLike
3D Printed Design Work
These works represent 3D models I have designed with additive manufacturing as the next step factored into the design process.